Bass Setup Guide: Fix Tuning Issues Fast
Are you tired of constantly retuning your bass between every single song? Does your instrument lose its pitch after just a few minutes of intense playing? You are certainly alone. Tuning instability is one of the most common frustrations for bass players at every skill level. Whether you are a beginner picking up your first instrument or a returning player dusting off an old favorite, a bass that will not stay in tune can ruin your practice. This guide will transform your bass setup routine with professional techniques to keep your pitch rock-solid.
Why does my bass keep going out of tune? This is the question most players ask when they feel like giving up. Often, the problem is not your ears or your playing style. It is usually a matter of "setup"—the physical adjustment of the instrument's parts. If your setup is wrong, even the most expensive bass will sound terrible and feel difficult to play.
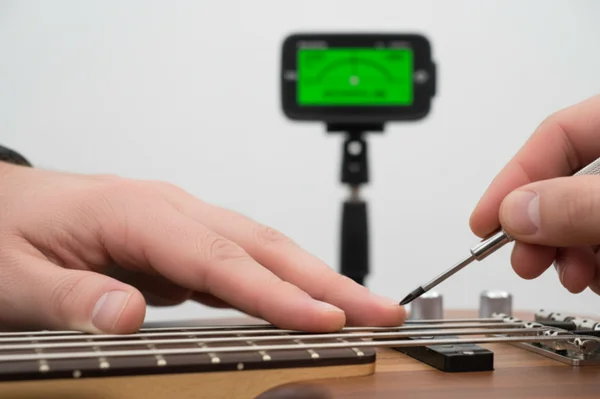
In this guide, we will walk you through the essential adjustments to improve your stability. We will cover everything from neck relief to intonation. Before you start twisting screws, it is important to have a reliable reference point. You can try our free tool to check your current tuning and see exactly how far off your strings are before you begin the adjustment process.

Understanding Bass Guitar Setup Fundamentals
To fix a problem, you first need to understand how the instrument works. A bass guitar is a balance of tension. The heavy steel strings pull with hundreds of pounds of force. The wood of the neck and the metal hardware must resist that pull perfectly to keep the notes clear. When this balance is lost, your tuning suffers.
Why Your Bass Keeps Going Out of Tune
There are several reasons why a bass loses its pitch. Temperature and humidity shifts warp wooden necks over time. Moving your bass from a cold car to a warm room can instantly flatten or sharpen strings. Mechanical issues like loose tuning pegs or poor string installation also contribute. Even friction at the nut can trap strings, causing sudden tuning jumps during heavy playing. By identifying these causes, you can take the first step toward a permanent fix for your bass setup.
Tools You’ll Need for Setup
You do not need a professional workshop to perform a basic setup. Most of the tools are likely already in your home. To get started, you will need:
- A set of Allen keys (hex wrenches) usually provided with the bass.
- A small Phillips head screwdriver.
- A metal ruler or straight edge (preferably with millimeter markings).
- A stable, flat surface to work on.
- A high-quality real-time tuner for bass guitars to verify your pitch.
Having a clean workspace and the right tools prevents you from damaging the hardware. Always remember to make small adjustments. A little goes a long way when it comes to instrument maintenance.
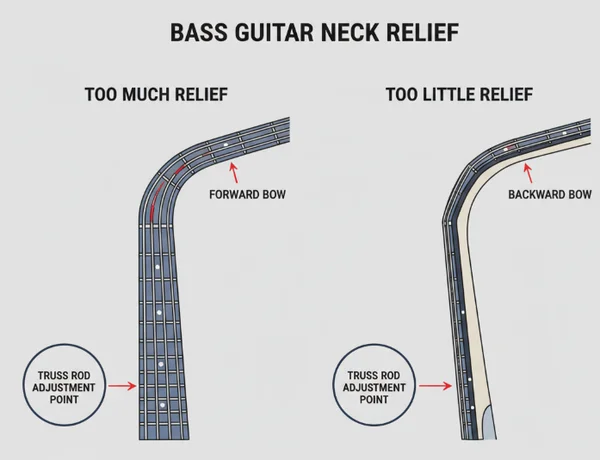
The Truss Rod Adjustment for Optimal Neck Relief
The truss rod is a long metal bar inside your bass neck. Its job is to counteract the massive tension of the strings. If the strings pull too hard, the neck bows forward like a banana. If the truss rod is too tight, the neck may bow backward. Finding the middle ground is the key to a stable instrument.
What Is Neck Relief and Why It Matters
"Neck relief" is the slight curve in the neck that allows the strings to vibrate without hitting the frets. If the neck is perfectly flat, you will hear a lot of "fret buzz." If the curve is too deep, the strings will be too high off the fretboard, making it hard to play and causing the tuning to feel inconsistent.
Proper neck relief evens out string tension. This stability translates to longer-lasting pitch accuracy. If you notice your bass feels "stiff" or harder to press down than usual, your neck relief might be the problem.
Step-by-Step Truss Rod Adjustment Guide
Adjusting the truss rod can be intimidating, but it is safe if you follow these steps:
- Check the relief: Hold down the string at the 1st fret and the 15th fret at the same time. Look at the gap between the string and the 7th fret. There should be a tiny gap, about the thickness of a business card.
- Find the adjustment nut: This is usually at the headstock or where the neck meets the body.
- Make the move: To tighten the rod (fix a forward bow), turn it clockwise. To loosen it (fix a backbow), turn it counter-clockwise.
- Go slow: Only turn the wrench a quarter-turn (1/4) at a time.
- Retune: Every time you move the rod, the pitch will change. Use an accurate tuner to bring the bass back to standard pitch before checking the relief again.
Give the wood a few minutes to settle after each adjustment. Patience is your best friend here.
Optimizing Action Height for Better Tuning Stability
Once the neck is straight, you need to look at the "action." This refers to the height of the strings above the frets. While some players prefer high action for a punchy sound, and others like low action for speed, extreme heights can cause tuning problems.
How Action Height Affects Tuning
If your action is too high, you have to push the string a long distance to reach the fret. This extra stretching actually pulls the note sharp. You might tune an open string perfectly, but as soon as you play a note on the 5th fret, it sounds out of tune. This is a classic sign of action issues. Conversely, if the action is too low, the string might vibrate against the frets, causing a "buzzing" sound that confuses electronic tuners and makes your pitch sound unstable.
Adjusting Your Bass's Action Safely
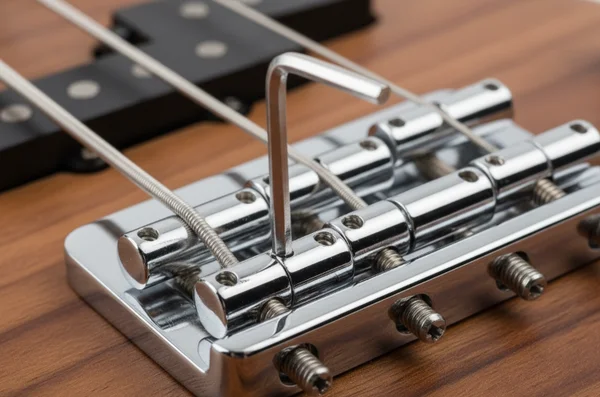
The action is adjusted at the bridge (where the strings are attached to the body). Each string sits on a small part called a "saddle."
- Tune the bass: Always start with a tuned instrument using a bass tuner.
- Adjust the saddles: Use a small Allen key to raise or lower the individual saddles.
- Measure: A standard height for a bass is about 2.5mm for the E string and 2.0mm for the G string, measured at the 17th fret.
- Test for buzz: Play every note on the neck. If it buzzes, raise the saddle slightly.
Lower action improves playability, but aim for a balance. Your ultimate goal? Consistent tuning at every fret position.
Perfecting Intonation for Accurate Tuning Across the Fretboard
Intonation is perhaps the most important part of a setup. A bass with "good intonation" is in tune with itself. This means that if the open string is an E, the note at the 12th fret is also a perfect E, exactly one octave higher.
Understanding Intonation and Its Importance
If your intonation is off, you can tune your bass for ten hours and it will still sound bad when you play with a band. You might sound great playing low notes, but as you move up the neck, you start to sound "sour" or dissonant. This happens because the length of the string is not perfectly matched to the placement of the frets. Learn to tune your bass like a pro by adjusting the bridge saddles forward or backward to change the vibrating length of the string.
Step-by-Step Intonation Adjustment Process
To set your intonation, follow this simple process:
- Tune the open string: Use our online bass tuner to get a perfect reading.
- Play the 12th fret: Press the string down at the 12th fret and check the pitch.
- Compare: Is the 12th-fret note sharp or flat compared to the open note?
- Move the saddle:
- If the note is sharp, move the saddle back (away from the neck) by tightening the screw at the back of the bridge.
- If the note is flat, move the saddle forward (toward the neck) by loosening the screw.
- Repeat: Retune the open string and check the 12th fret again. Continue until they match perfectly.
This process takes time but ensures your bass sounds professional everywhere on the fretboard.
Bass Tuning Fixes: Nut, Strings & Environmental Factors
Sometimes the setup is perfect, but the bass still slips. This usually comes down to "friction points" or the quality of the strings themselves.
The Nut's Role in Tuning Stability
The nut is the white or black piece of plastic/bone at the top of the neck. If the slots in the nut are too tight, they "pinch" the string. When you turn the tuning peg, the string gets stuck, then suddenly jumps, making it impossible to tune accurately. You can fix this by applying a tiny bit of graphite (from a pencil) into the slots. This acts as a lubricant and lets the string slide smoothly, preventing those annoying tuning jumps.
String Quality and Installation Techniques
Old strings lose their elasticity and will never stay in tune. If your strings are dull and brown, it is time for a new set. When installing new strings, make sure you have at least 2 or 3 neat wraps around the tuning post. Avoid overlapping the wraps, as this creates "slack" that causes the string to go flat while you play. After putting on new strings, give them a gentle stretch and then use our tool to bring them back to pitch.
Final Thoughts
With these adjustments dialed in, your bass will stay in tune even during marathon practice sessions. By understanding and adjusting these key components—neck relief, action height, intonation, and string condition—you have gained the knowledge to solve most common tuning issues.
Remember that a bass setup is both an art and a science. Every instrument is different, and as the seasons change, you may need to make small tweaks to keep it performing its best. Test your bass’s tuning stability instantly to ensure your work is holding up. A properly set-up bass not only stays in tune better but also plays more comfortably, which makes bending strings and locking into grooves effortless. Our free online bass tuner is the perfect companion for your setup journey, providing the accuracy you need to get the job done right.
Common Questions
How often should I adjust my bass's truss rod?
Most players only need to adjust the truss rod twice a year—once when the heat comes on in the winter and once when it goes off in the summer. However, if you change to a different gauge of strings (switching from light to heavy), you should check the relief immediately. Always use our free bass tuning tool to ensure your tension is correct before checking the neck.
Can I perform these setup adjustments myself if I'm a complete beginner?
Yes! Basic maintenance like adjusting action and intonation is safe for beginners. The only part that requires extreme care is the truss rod. As long as you only turn it 1/4 turn at a time and never force a stuck screw, you will not damage your instrument. It is a great way to learn how your bass works.
Why does my bass go out of tune when I use the whammy bar?
While most basses do not have whammy bars, some custom models do. Tuning issues with tremolo systems are usually caused by friction at the nut or bridge. Lubricating the nut with graphite and ensuring your strings are "locked" onto the tuning pegs can help.
How much does a professional bass setup cost, and is it worth it?
A professional setup usually costs between $50 and $100 plus the price of strings. It is absolutely worth it if your bass is very difficult to play or if you have a high-end instrument you are afraid to touch. However, learning to do it yourself saves money and allows you to customize the feel of the bass to your specific playing style.
What's the difference between a setup and a professional repair?
A setup is like a "tune-up" for a car; it involves adjusting existing parts to make them work better. A repair involves fixing broken parts, such as a cracked neck, a broken nut, or faulty electronics. If your tuning pegs are physically broken or the neck is warped beyond what the truss rod can fix, you need a professional repair. For everything else, a good online tuner and a few tools are all you need.